WORK SCHEDULE
The main purpose of this menu is to display and add Work Schedule for the selected employee, branch, department, or all.
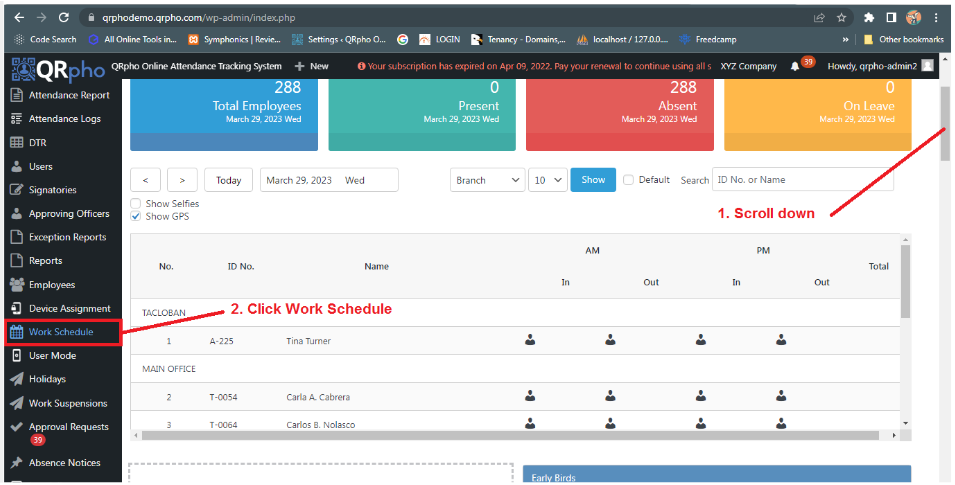
1. From Dashboard, SCROLL DOWN
2. Click the WORK SCHEDULE menu.
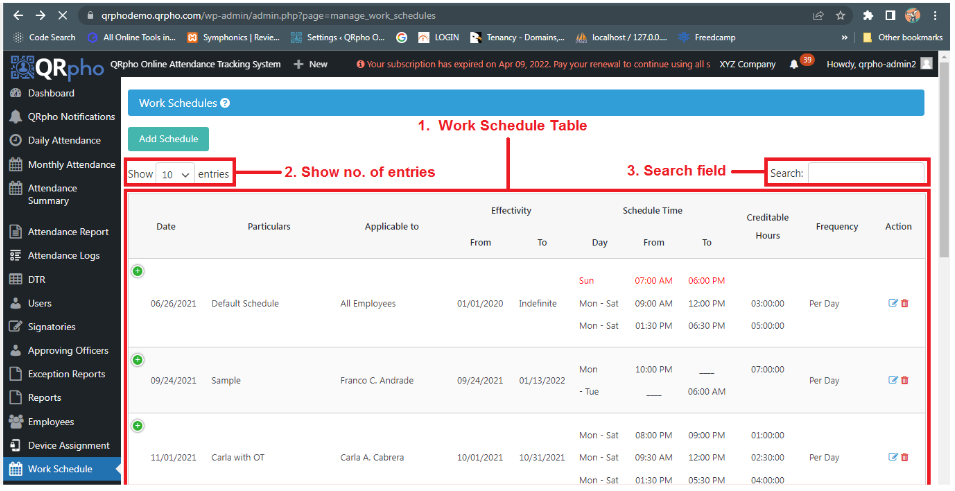
After clicking the Work Schedule menu, Work Schedules list is displayed.
1. WORK SCHEDULE TABLE. is where you will see all the work schedules created for the employees.
2. SHOW NO. OF ENTRIES. is where you select the no. of entries displayed per page on the table. Default display is 10 entries.
3. SEARCH FIELD. is where you filter the data by typing keywords.
ADD SCHEDULE
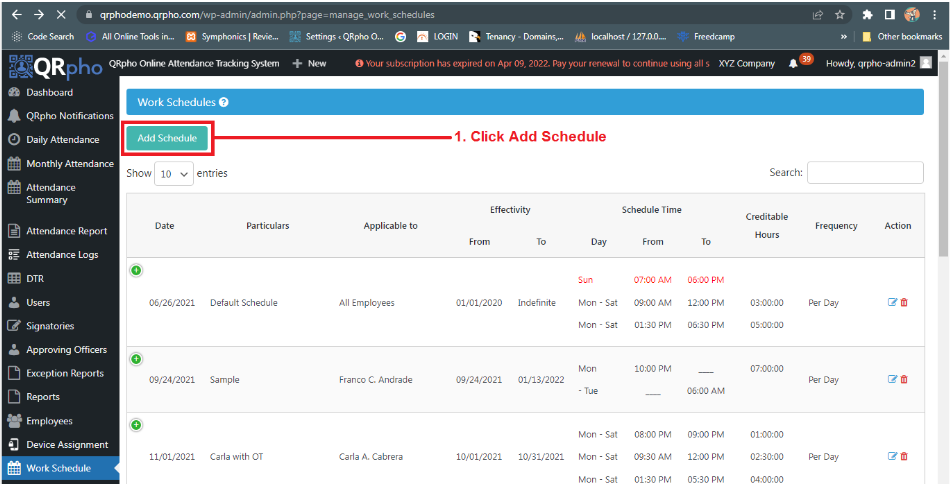
1. Click the ADD SCHEDULE to add a new schedule for your employees.
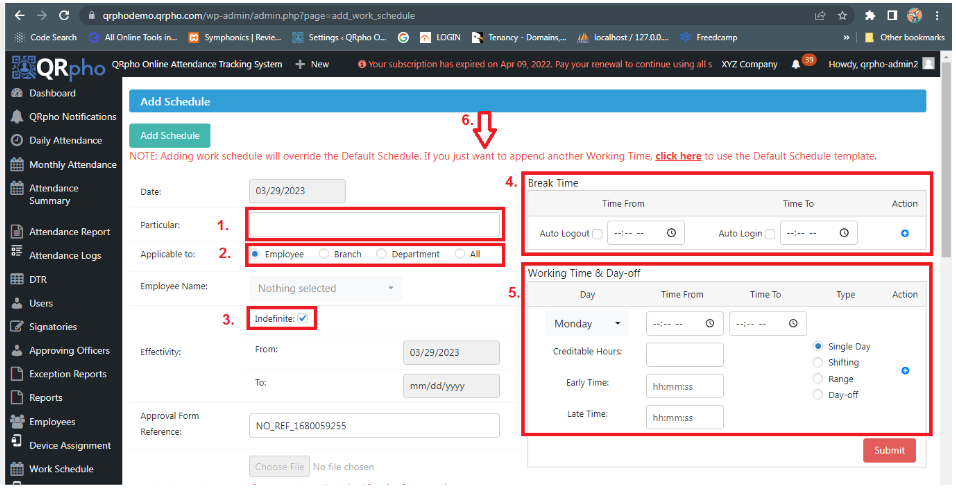
After you’ve clicked the Add Schedule button, fill in all the required information on adding a Work Schedule.
Take note of the important fields below:
1. PARTICULAR. is the label or name of the schedule you are creating.
2. APPLICABLE TO. This is where the work schedule is applicable to. You can select an employee or multiple employees you want to apply the work schedule to. You may also select by Branch or Department. Just select a department or branch name to which the schedule will be applicable to. You can also select All.
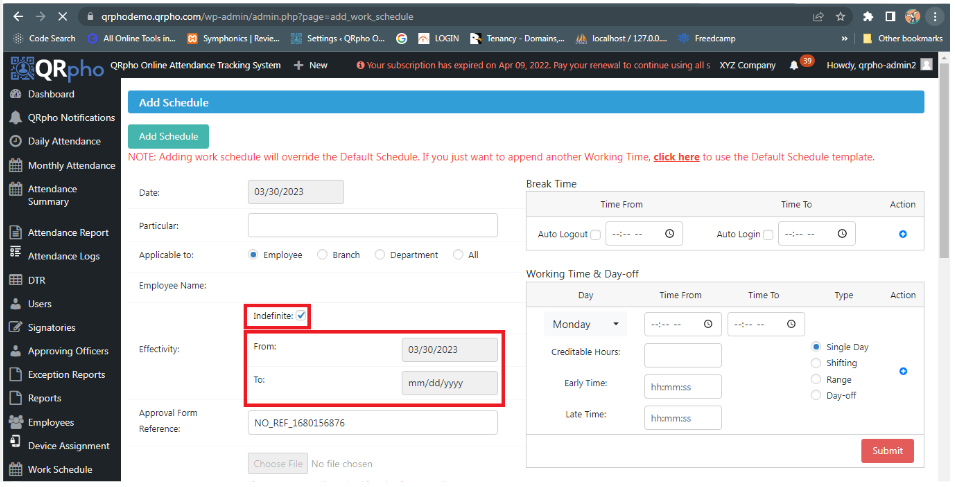
3. EFFECTIVITY. By default, the Indefinite check box is checked. This means the work schedule has no end date. You can change the effectivity of the schedule by unchecking the indefinite checkbox and setting the From: and To: date picker. By default, the From date picker is set to the current date. You can change it backwards if you want to ante-date the effectivity of the work schedule.
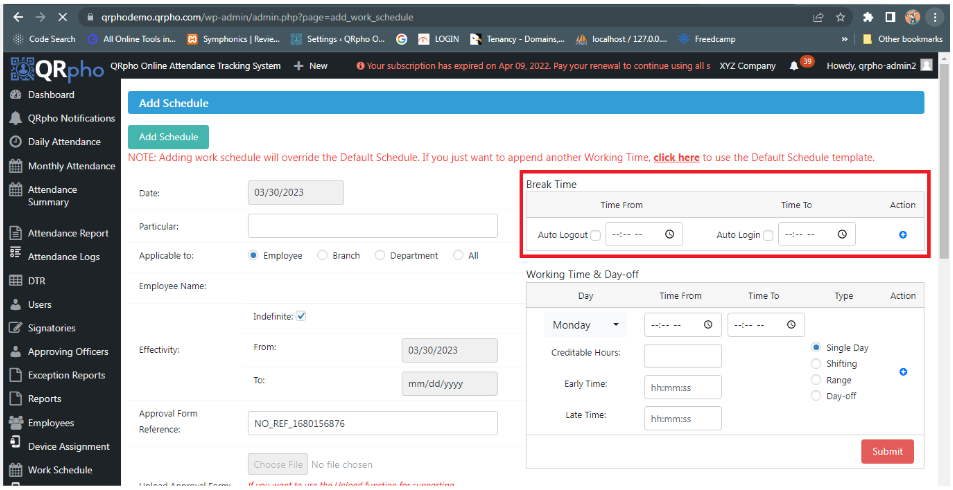
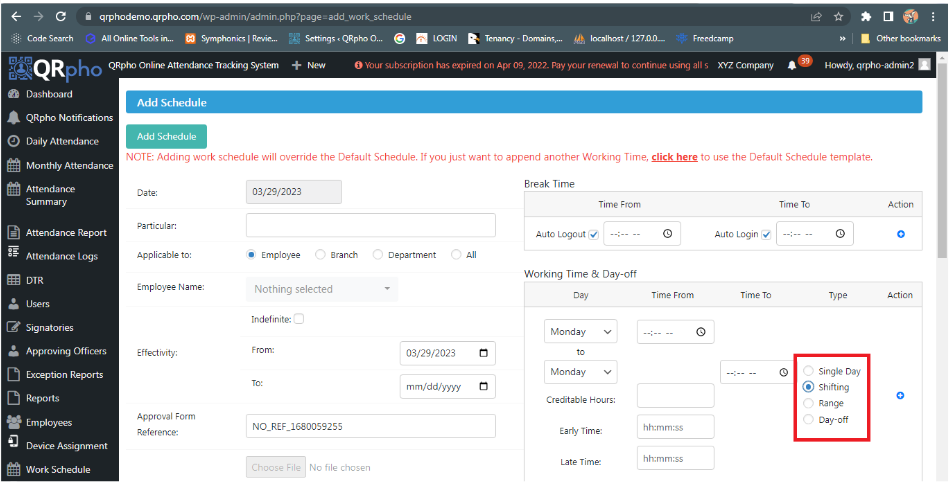
4. BREAK TIME. it works by setting the break time of the employee. It is the duration of the break time. You can set the From: Time Picker where the break time should start to take effect and To: time picker where the end of the break time is set. You can also check the Auto Logout and Auto Login boxes for the system to automatically logout and login the employees during break times. This is done when you want the employees to login and logout only once in the morning (at start of work day) and in the afternoon (at end of work day). However, we discourage this practice as it is prone to abuse. Employees may just report to office in the morning, then leave and be back at end of day for the logout.
5. WORKING TIME & DAY OFF. is where you set the work schedule of the employees. You can choose the Type of Work Schedule to add like SIngle Day, Shifting, Range, and Day Off. This will help you set a work schedule more effectively by knowing which type of schedule to use. You can refer to the detailed discussion on this later in the guide.
6. NOTE. Adding a working schedule will overwrite the default schedule found in Settings menu. If you just want to add a working time, you can add a working time using the same default working schedule by clicking the link “Click here“. It will load up the Default Working Schedule template, then you can just add/edit a working time schedule.
EFFECTIVITY:
EFFECTIVITY DATE. Default effectivity is set to Indefinite. If you want to change the effectivity – the From: [Date] and To: [Date] just uncheck the Indefinite box then set the desired dates of effectivity of the Work Schedule. You can ante-date the From [date] if you want the schedule to take effect few days before the current date.
Caution: When selecting Indefinite in Effectivity, please be aware that the From input will still take effect as its starting effectivity period.
BREAK TIME:
1. TIME FROM: The start time for Break Time period (like lunch or coffee break).
2. AUTO-LOGOUT: If checked, the system will auto-logout all Applicable Employees on this schedule. If not checked, the time will mark the end of a preceding schedule to start a break time.
3. TIME TO: The end time for Break Time (like lunch or coffee break) period.
4. AUTO-LOGIN: If checked, the system will auto-login all Applicable Employees on this schedule. If not checked, the time will mark the beginning of the next schedule and ends the break time.
5. BREAK TIME: When a break time schedule is set here, it will automatically a break time period on the work schedule set below. For example: If the schedule is Monday 8:00am to 5:00pm with a break time of 12:00pm to 1:00pm. This means that the works schedule starts at 8:00am with Lunch break of 12:00pm to 1:00pm and work ends at 5:00pm. So the employee needs to login/logout twice (login 8:00am, logout lunch at 12:00pm, then login at 1:00pm then logout at 5:00pm.
WORKING TIME & DAY OFF:
1. SINGLE DAY. This is used when the work schedule is different every day like the work schedule on Monday is different on Tuesday, Wednesday, Thursday and the rest of the days. It is best used for employees with different schedules every day. Like, for example, a part-timer. Her/His work schedule is based on his/her available time on that day or week.
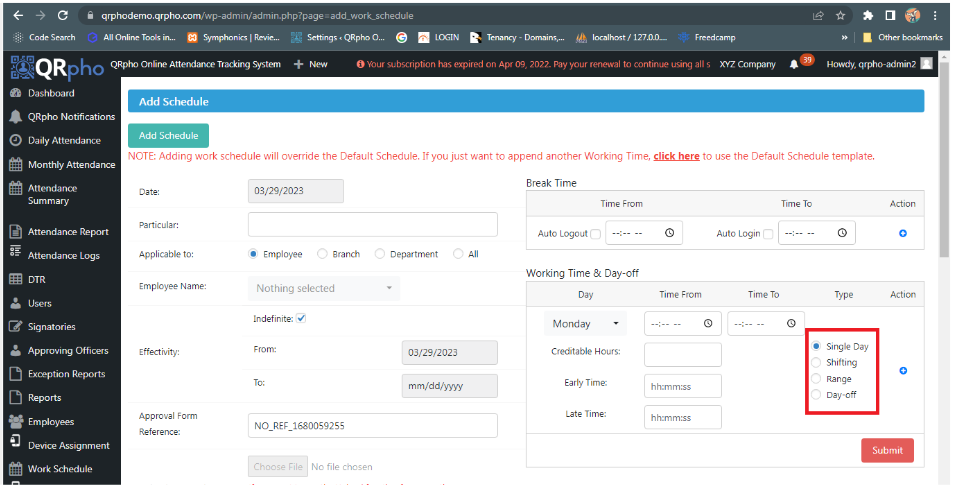
2. SHIFTING. This is best used for employees with work schedules that cross midnight or who log in today and logouts out tomorrow such as nurses and security guards but is not limited to those who log in late at night and log out in the morning. Using the default schedule won’t work because the pairing of logs will cause a conflict and will not match since the logs are taken on different dates.
3. RANGE. This is best used for employees who have regular and fixed working time schedules for several days. An example of this is a regular or permanent employee whose working schedule is from Monday to Friday from 8:00 am – 12:00 nn and 1:30pm -5:00pm.
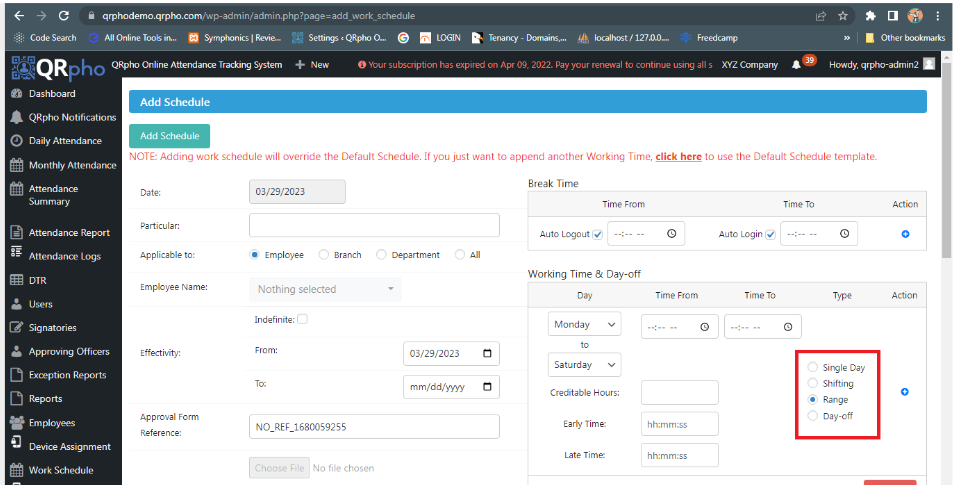
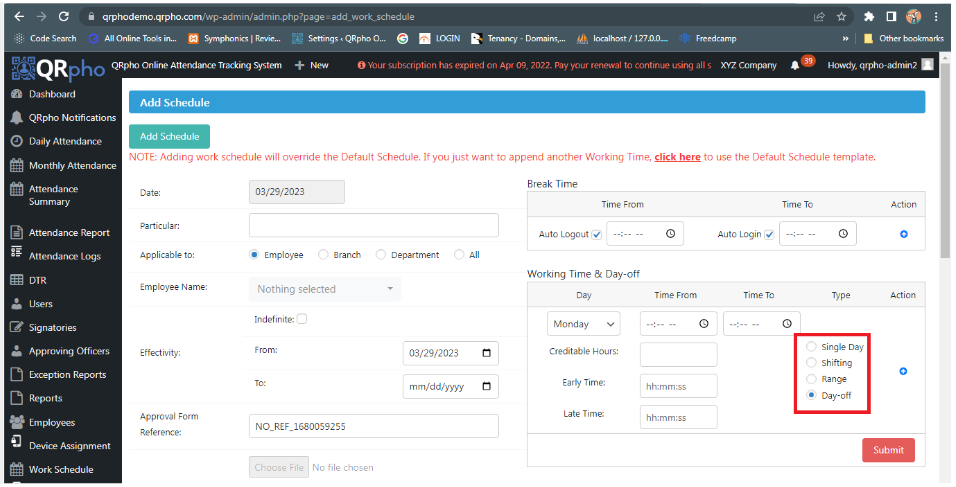
4. DAY OFF. This is used to display a day off on your DTR when that set day of the week is your day off. The purpose of this is to not to have an empty log on your DTR instead it will appear as a Day Off Text on your DTR.
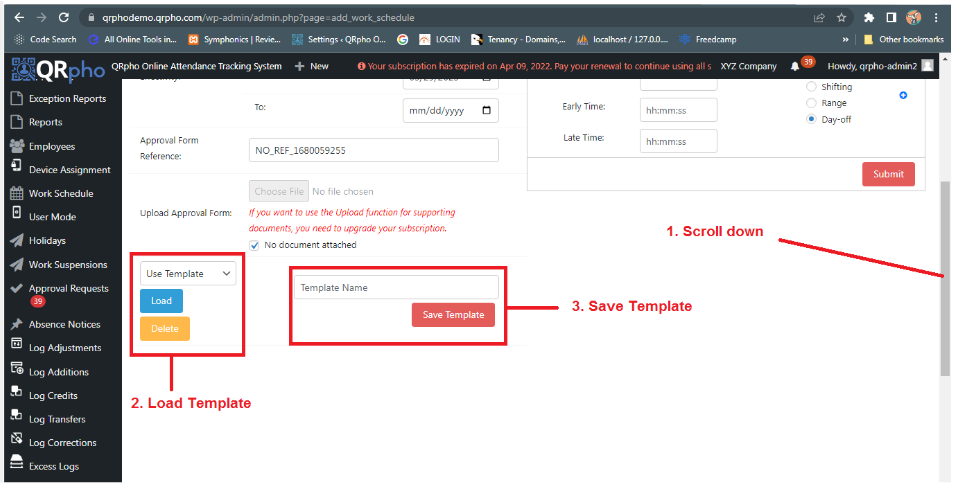
SCHEDULE TEMPLATE:
1. SCROLL DOWN.
2. You can LOAD the existing working schedule templates that were saved before.
3. You can also save a working schedule template that you’ve created, just name the template and click the SAVE TEMPLATE button. To use your created template, just load the template.
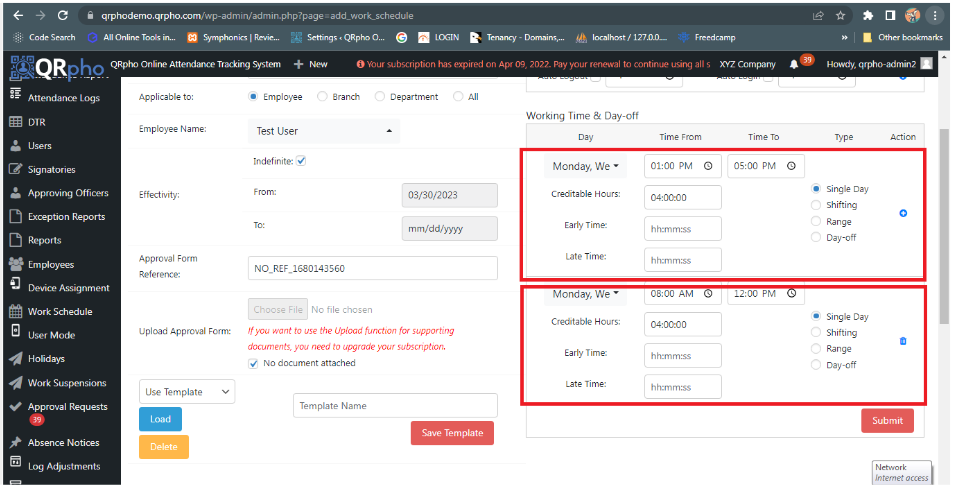
SINGLE DAY – WORK SCHEDULE TYPE:
We’ll add a work schedule using the Single Day work Schedule type.
1. PARTICULAR. Enter the name of the Schedule you want.
2. APPLICABLE TO. Select the Employee(s) or Branch or Department or All where the schedule is applicable to.
3. EFFECTIVITY. Set the date of Effectivity date of the schedule. Default setting is Indefinite. Just unclick the Indefinite box and to change the date.
4. APPROVAL FORM. EIf you want to upload Approval forms, enter the reference number of the Approval documents then upload the Scanned document for easy reference. Just compress the file for faster loading. You may opt not to attach the documents by checking the “No Document Attached“.
5. TEMPLATE NAME. Add a Template Name and Save it if you want to use the same schedule to another group of employees.
6. BREAK TIME. Add a schedule here if you want to have a break time for your employees like lunch break and/or coffee break. You can have the option to check the Auto Logout and Auto Login. If you set the Work Schedule straight from morning to afternoon, you can add a break time schedule. However, if the work schedules are separated and do not include the break time, then no need to add Break Time.
7. WORKING TIME & DAY-OFF. Add the schedule on a daily basis. Using the Single Day option means that the work schedule is different every day.
8. CREDITABLE HOURS. This field automatically computes the total number of hours based on the schedule. However, you can opt to edit and set maximum creditable hours for that specific schedule.
9. EARLY TIME. Add here the number of minutes before start of work hours that login is considered early time. So if start of work is 8:00 am and you want any login before 7:45am to be early, just set 00:15:00 here to mean any login beyond 15 minutes before start of work hours is considered early.
10. LATE TIME. Add here the number of minutes after start of work hours that login is considered late time. So if start of work is 8:00 am and you want any login after 8:15am to be late, just set 00:15:00 here to mean any login beyond 15 minutes after start of work hours is considered late.
11. SUBMIT. Click this button when done with the setup of the work schedule.
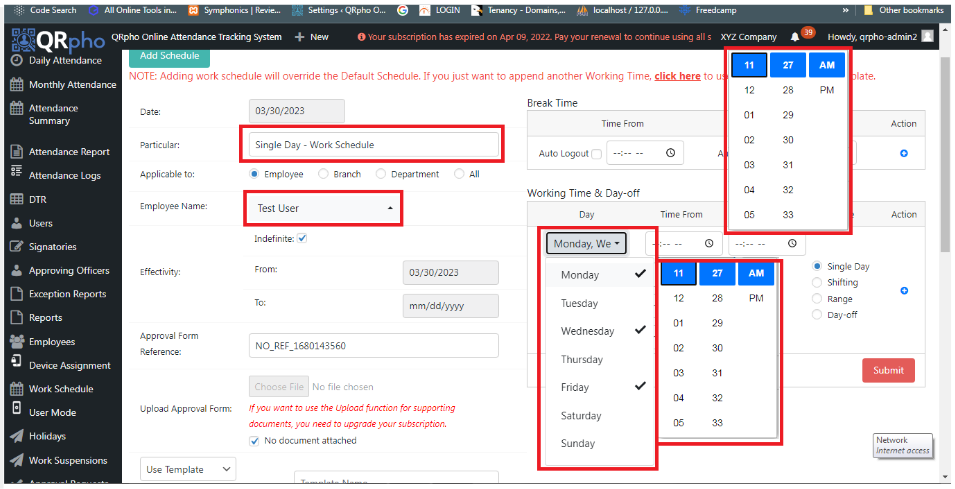
Note: You may add a Single Day with Time-from 8 AM and Time-to 5 PM.
The sample’s style of adding Single Day will effectively exclude the 12 NN to 1 PM lunch break from credit computation
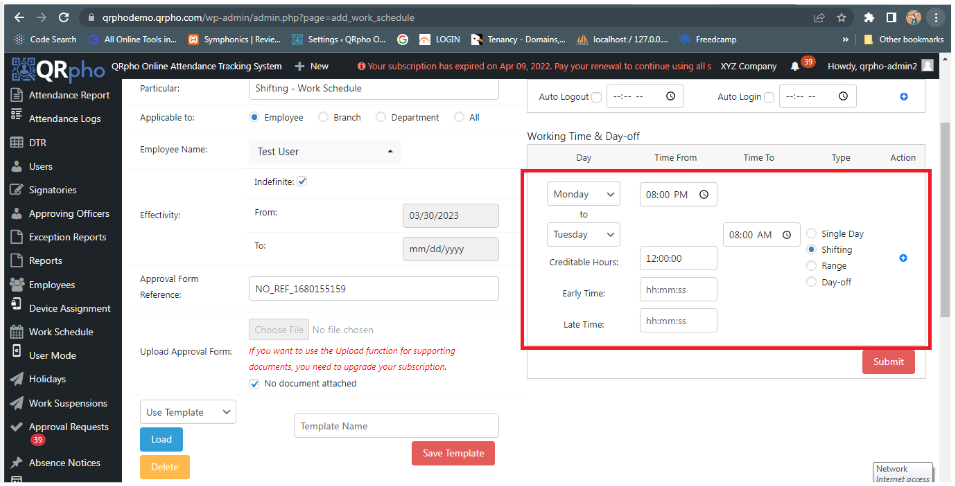
SHIFTING – WORK SCHEDULE TYPE:
For works rendered in a span of two calendar days(ex. Monday – Tuesday) ex: Monday 12 PM – Tuesday 12 PM Only 1 Day of Time From should exist per the Work Schedule. ex: Monday 12 PM – Tuesday 12 PM, there should be no other entry that starts Monday even if it is at a different time. Creditable Hours the maximum credit for the Shifting Work Schedule
1. PARTICULAR.
2. The SELECTED EMPLOYEE for this tutorial.
3. The WORK SCHEDULE DAY was set from Monday to Tuesday.
4. You also select a LOGIN TIME and LOGOUT TIME for the selected work schedule type.
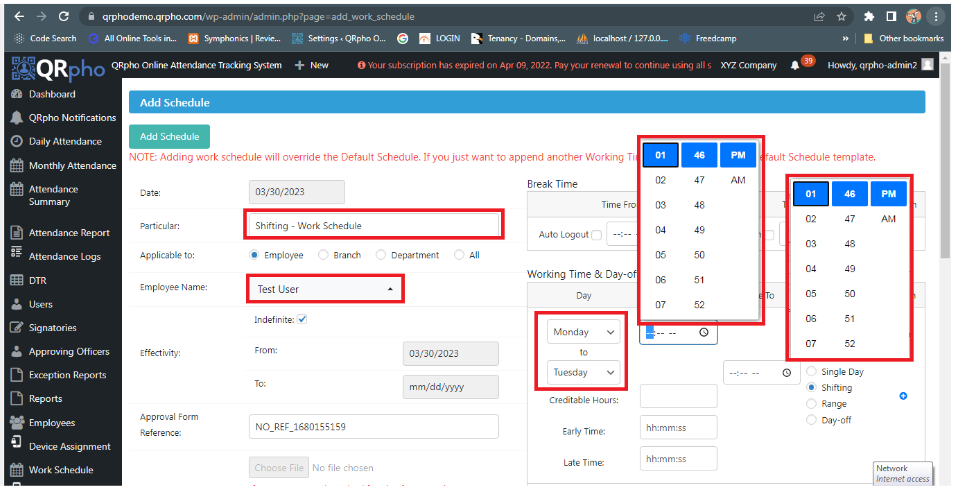
Notes: Common use cases for a Shifting type are for works rendered in a span of two calendar days(ex. Monday 8 PM – Tuesday 8 AM). Shifting type can be also used for a 24-hour work schedule. ex: Monday 8 PM – Tuesday 8 PM Maximum credit for the Shifting type can be optionally set.
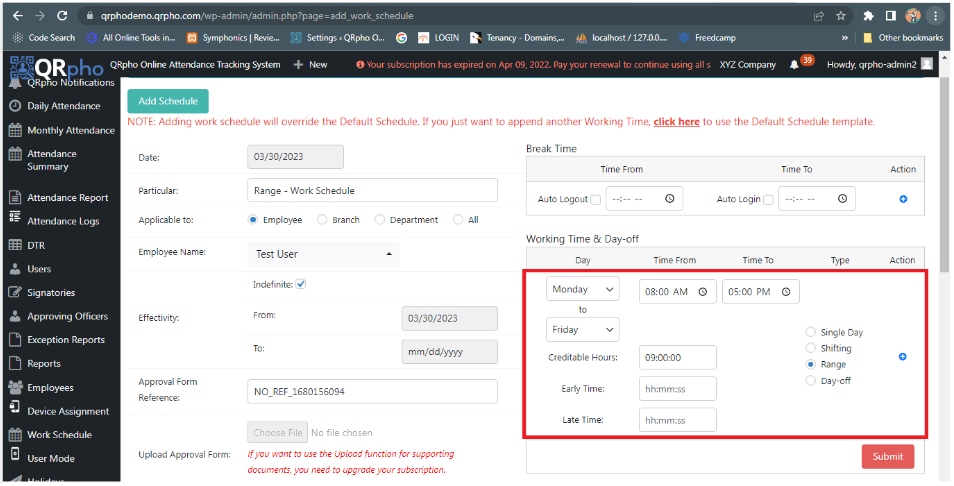
RANGE – WORK SCHEDULE TYPE:
For Range and Single Day Types, there should still be Logout in the morning and Login in the afternoon if worktime is Regular or is not separated by AM or PM.
1. PARTICULAR.
2. The SELECTED EMPLOYEE for this tutorial.
3. The WORK SCHEDULE DAY was set from Monday to Friday.
4. You also select a LOGIN TIME and LOGOUT TIME for the selected work schedule type.
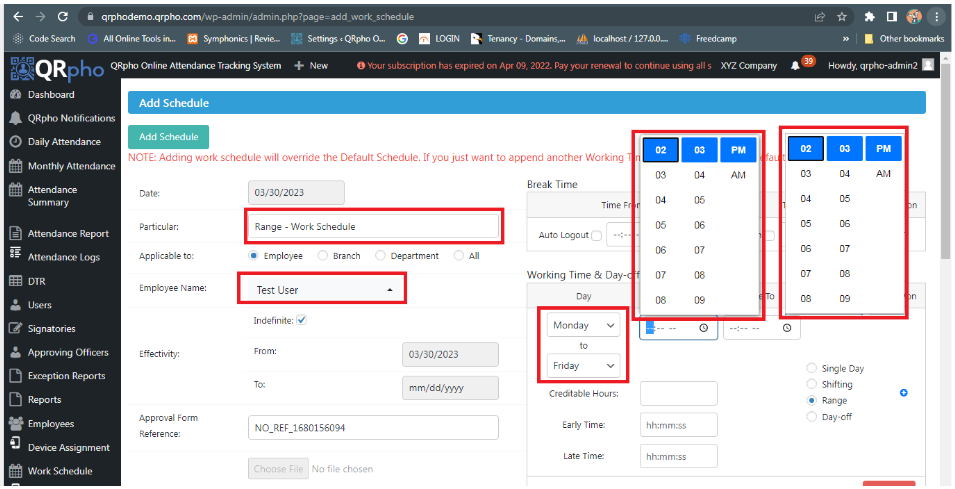
This style includes lunch breaks in credit computation. To exclude it, you may use the Break Time and enable auto Logout and auto Login. Then set the Time From the start of the lunch break and the Time To to the end of the lunch break. The auto-login/logout will only work if there are no logout and login during that break. If logs are present, they will be used in credit computation instead of the Break Time auto logs.
SUBMIT:
Don’t forget to click the SUBMIT button once you’re done filling up the form to save your work schedule.